Setting up an LDAP server for your development environment
When you need to develop an Java application that uses LDAP as a datastore it is useful to setup a local LDAP server. The Apache Directory project provides two useful products:
- Apache Directory Server: a full-featured LDAP server completely in Java
- Apache Directory Studio: a LDAP tooling platform based on Eclipse RCP which includes ApacheDS
This tutorial shows, how to install the LDAP tools and how to setup an LDAP server for your development environment.
Download and Install Apache Directory Studio
Download Apache Directory Studio, choose the right distribution for your platform and follow the installation steps there.
If you already use Eclipse you could also install the Apache Directory Studio Plug-ins into your existing Eclipse installation.The update site is http://directory.apache.org/studio/update/1.x, choose at least "LDAP Browser", "LDIF Editor" and "ApacheDS" features. Open the "LDAP perspective after installation is finished.
Setup and Start Apache Directory Server
Of course you could download and install a standalone version of Apache Directory Server. However a much simpler solution is to setup the LDAP server directly within Apache Directory Studio or within your Eclipse environment respectively. Apache Directory Studio is shipped with an integrated Apache Directory Server plus some management tools.
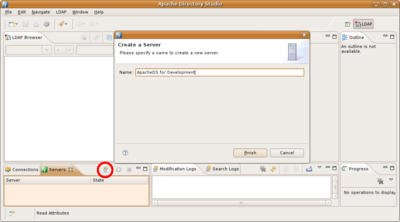
Open the "Servers" view in the bottom left corner of the "LDAP" perspective, click the "New Server" button and enter a name like "ApacheDS for Development".
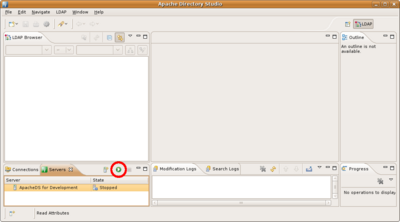
This creates a new server instance. Then you could select the server and start it by clicking the "Run" button.
Now the server runs. By default it listens to ports 10389 and 10636 (for SSL). The admin account is "uid=admin,ou=system" and the password is "secret". You could right-click the server and select "Open Configuration" in order so view and edit the server settings.
Use the LDAP Browser to connect to the Server
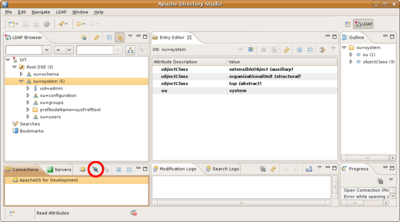
Right-click the server and select "LDAP Browser" -> "Create a Connection". Then switch to the "Connections" view, you see a new connection to the created server instance was added. Select the connection and click "Open Connection". Now you could browse the LDAP server.
Load some sample data
As you see there's not much data in the server, in fact only system configuration. So lets import some example data. For LDAP there is a standardized data interchange format, called LDIF. Open a new LDIF editor (File->New...->LDAP Browser->LDIF File). In the opened editor click the "Browse..." button and select the connection. Then copy/paste the following content into the LDIF editor, ensure that there is a empty line at the end of the content. Finally click the green "Execute LDIF" button and the data slips into the LDAP server.

dn: dc=example,dc=com
objectClass: domain
objectClass: top
dc: example

dn: ou=Users,dc=example,dc=com
objectClass: organizationalUnit
objectClass: top
ou: Users

dn: ou=Groups,dc=example,dc=com
objectClass: organizationalUnit
objectClass: top
ou: Groups

dn: cn=Adan Abrams,ou=Users,dc=example,dc=com
objectClass: inetOrgPerson
objectClass: organizationalPerson
objectClass: person
objectClass: top
cn: Adan Abrams
sn: Abrams
description: 19741108000000Z
employeeNumber: 7
givenName: Adan
telephoneNumber: 254-323-1920
telephoneNumber: 902-451-7619
uid: aabrams
userPassword:: c2VjcmV0

dn: cn=Chuck Brunato,ou=Users,dc=example,dc=com
objectClass: inetOrgPerson
objectClass: organizationalPerson
objectClass: person
objectClass: top
cn: Chuck Brunato
sn: Brunato
description: 19650324000000Z
employeeNumber: 3
givenName: Chuck
telephoneNumber: 169-637-3314
telephoneNumber: 907-547-9114
uid: cbrunato
userPassword:: c2VjcmV0